I get questions about my messy bun all the time on instagram, and have always been hesitant to do a tutorial. It’s kind of a style that I just throw my hair into quickly when I don’t feel like really doing my hair, and it’s a little difficult to explain. However, with warmer days just around corner, it felt appropriate to finally break down this look. As with any hair tutorial, the steps are going to vary with your hair length and thickness, so hopefully the steps below give you a starting point and you can fine-tune it from there.
What you’ll need: one elastic hair tie, bobby pins, hair spray. This style works best on second-day hair, but you can always add a bit of texturing spray if you’re doing it on freshly washed hair.
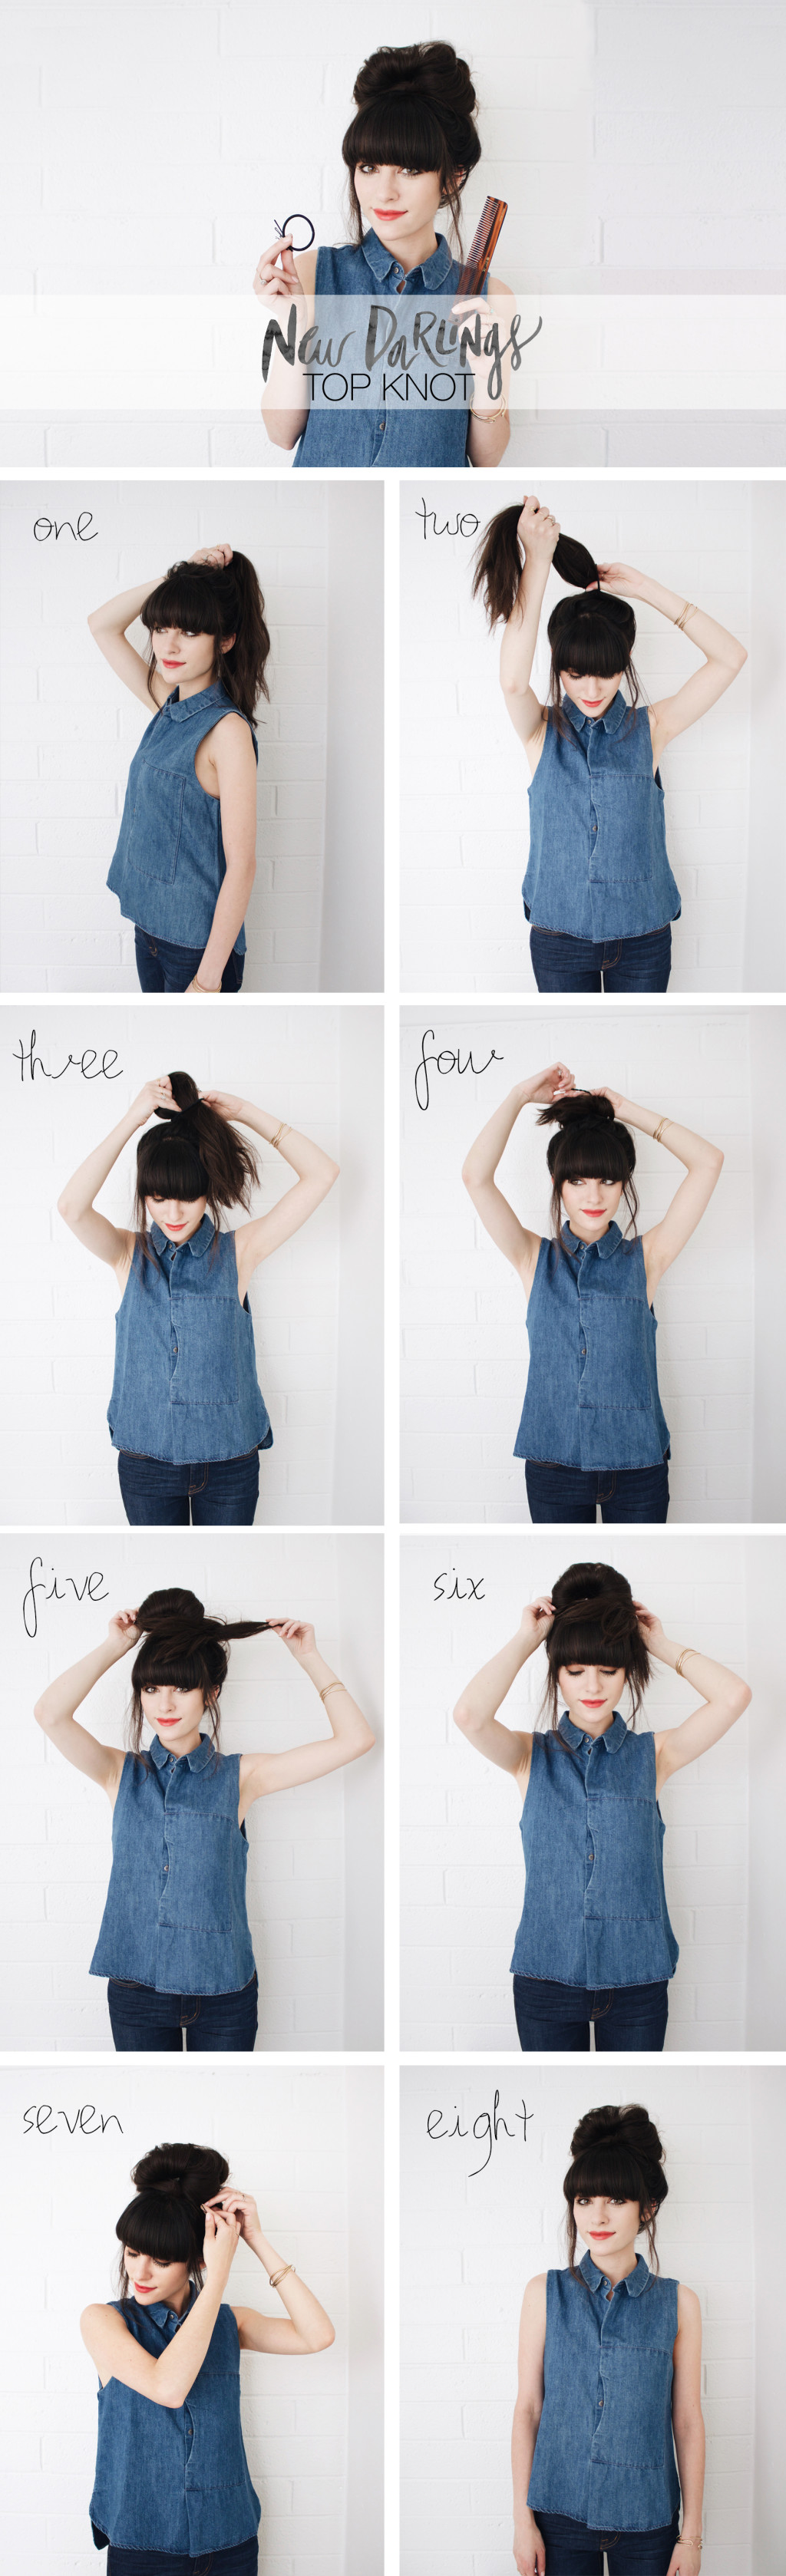
Step 1: Start by making a high pony tail, on the top of your head. If you have bangs, section those off, along with some fly away pieces to frame your face.
Step 2: Only pull your hair fully through the hair tie once. (This will depend on the thickness of your hair. Doing it this way, will keep the bun loose and give you room to pull pieces in the end to create fullness.)
Step 3: Half way through the second wrap around, only pull the pony tail through half way. Keep your hands in position for the next step — don’t let go of the hair tie.
Step 4: With your hands still in position and hair pulled half way through the hair tie, pull the hair tie around the remaining hair sticking out and bun. At this point, it will most likely look like a mess — don’t worry. The next steps are all about fine tuning it. 😉
Step 5: So now you have this little bun on your head with half the hair from your pony tail sticking out. Kind of funny, right?
Step 6: The bun/half pony tail part, somewhat resembles a fan right about now. Pull the sides of your fan-like bun down to your head, we’re gonna pin those down in a minute. This is the step where I really like to pull the bun apart and make it look full.
Step 7: Pin down the sides of the bun, along with the rest of the hair from earlier. There’s really no right or wrong way to do this part, and every time it’s a bit different. You can pin the pieces in front, or pull some to the back. They will probably be all different lengths, depending on how you pulled apart the top part of the bun. I also like to “anchor” the bun in the back with some bobby-pins. This just keeps the height and full look throughout the day.
Step 8: Add a little hair spray and you’re ready to go!
Hope this was helpful! Please let us know if there’s anything else/other styles you’d like to see. ![]()
You can see some other hair and beauty posts here:
Hair Essentials | Milk Braids Tutorial | Healthy Hair with Moroccanoil

Love this hair-do! Looks beautiful on you… Thanks for sharing! XO!
Thanks Dani! 🙂
I’ve never thought of doing my hair this way, it looks great! My hair isn’t as thick as yours so may have to tease my ponytail to get the same effect 🙂
Tessa at Bramble & Thorn
Thanks. It’s such a quick hair-do for lazy days…such a good idea to tease the pony tail before making the bun! 🙂
LOVE your hair! I have to grow mine in order to do that hairstyle ):
http://www.nomoretulips.blogspot.com
Cute! If only I had this much hair for it to look this good!
Your hair is beautiful! I’m sure this style would look so cute on you! xo
This is definitely something I do when I either can’t be bothered, or I don’t have enough time!
http://jesandbleu.com
Same here! 🙂 xo
Would love to see a video of this!!
I’d love to see a video, too. I’m not sure I understand how to execute step 4.
Thanks for the tutorial. I use this style now whenever I don’t feel like curling it or if it’s too hot to bother. Also, you’re the reason I got bangs and I love them!
Oh, and love the playlist post. You guys fans of Local Natives or Wild Nothing? Can’t wait for more of those posts!
Ok, done! 🙂
Would you be able to show how you curl your hair? Especially how to keep your hair healthy without using to much heat?